To dial the prospects from Call Steps and Call Tasks in Gong through Koncert, you need to import those prospects into Koncert as a call list first. Only customers whose Gong is integrated with Koncert will have access to this feature.
Once you have logged into the Koncert portal, the Dialing Session tab is the default landing page. You can either import your call list(s) from Gong into Koncert from the Dialing Session tab or Lists tab.
Please refer to the article Gong Integration for detailed information on how to integrate Gong with Koncert.
- Upload from the Dialing Session tab – The Reports can be added directly into the Dialing Session tab, they can be uploaded and dialed whenever needed. Once imported, it will be automatically added under the Lists tab too.
- Upload from the Lists tab – First, add a report to the Lists tab. Once you add the list, the list will always be ready to import from the Lists tab. Select the list you wish to dial and click Begin Import. This not only saves you time but the list will be updated with the most recent data in your report. You will also get the benefit of seeing how many connects you have made with the list, how many dials, and when you most recently dialed with the list.
Below you can find how to import a call list from the Lists tab.
From the Lists tab:
- Go to the ‘Lists’ tab in the Koncert portal.

- Click on the Add Lists dropdown and select the option Add from Gong.

- After the Add Records From Gong window pops up, select one of the options from the Create Calling list (s) based on dropdown.

- My Sequences/Cadences – Allows you to import prospects under the Step - Call from a specific Cadences of Gong.
- All Sequences/Cadences (Shared) – Allows you to import prospects under the Step - Call from a specific Candence of Gong including your personal cadences as well as those shared by others.
- My Pending Calls – Allows you to import prospects under the Step - Call from all Cadences as well as prospects under the Task.
- Manual Calls – Allows you to import only prospects under the Task.
My Sequences/ All Sequences Cadences
After selecting the option ‘My Sequences/Cadences’ or All Sequences/Cadences (Shared), select the details for the following fields:

- Sequence/Cadence – Select the required cadence name e.g. All Sequence
- Choose Steps – Select the required step(s) from the dropdown e.g. Step 1 - Call
NOTE: Multiple ‘Step’ selection is allowed. All the prospects from the selected Steps will be imported to the Lists tab of Koncert.
To select and import the prospects from all the steps, click the All option from the dropdown.

After selecting the steps, a Voicemail section becomes available in the Voicemail section.
Select specific voicemails for each step or touch in the sequence.
After saving, the selected voicemails will be applied to the respective sequence steps during dialing sessions.
- Tags – The available tags will appear in a dropdown menu. The list will be imported with the prospects filtered based on your selected tags. Multiple tag selections are allowed. Only prospects that match all the selected tags will be imported.

- Battlecards – The Battlecards available under Administration » Battlecards are listed here. You can select the Battlecards you wish to use during dialing. These Battlecards will be displayed in the Settings Summary window under the Battlecards section.
- Save your List As – Name of the list being imported from Gong, which will appear in the Lists tab. By default, the name includes the selected sequence/cadence prefixed with ‘Gong’ and the count of selected steps as a suffix. For example, Gong – All Sequence – 2 steps. You can change the name if needed.
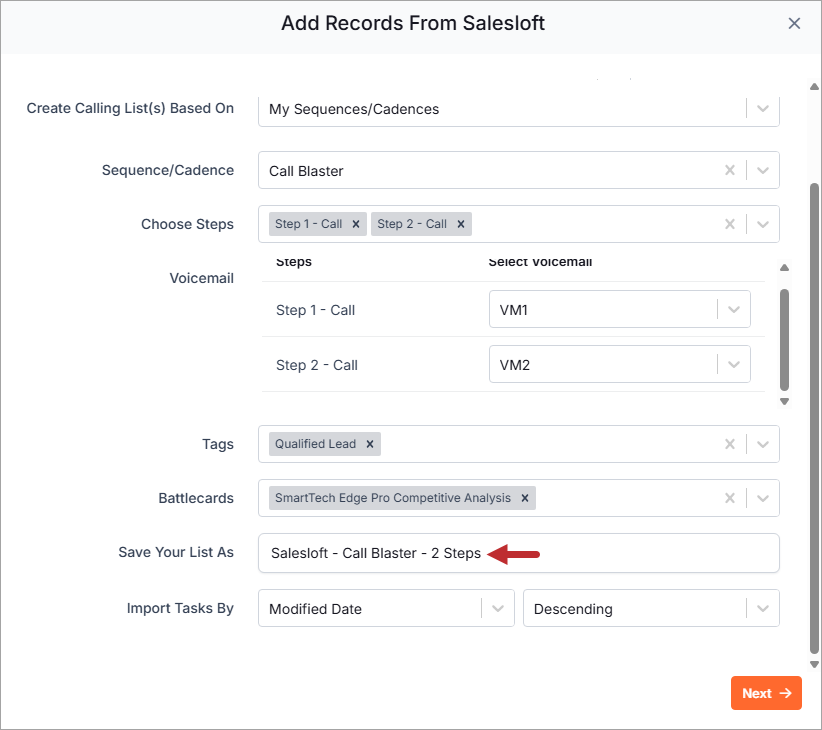
- Import Tasks By – Defaults to Modified Date and Order Descending. If needed you can change to Created Date from the dropdown and the required sorting order. The prospects will be sorted and imported in the order selected.
My Pending Calls
Select to import prospects under the Step - Call from all Cadences as well as prospects under the Task.
After selecting the option ‘My Pending Calls’, select the details for the following fields:

- Tags – The available tags will appear in a dropdown menu. The list will be imported with the prospects filtered based on your selected tags. Multiple tag selections are allowed. Only prospects that match all the selected tags will be imported.
- Battlecards – The Battlecards available under Administration » Battlecards are listed here. You can select the Battlecards you wish to use during dialing. These Battlecards will be displayed in the Settings Summary window under the Battlecards section.
- Save your List As – Name of the list that is being imported from Gong (will be displayed in the My Lists tab). Defaults to Gong- My Pending Calls. If needed, you can change the name.
- Import Tasks By – Defaults to Modified Date and Order Descending. If needed you can change to Created Date from the dropdown and the required sorting order. The prospects will be sorted and imported in the order selected.
Manual Calls
Select to import only prospects under the Task from Gong.
After selecting the option ‘Manual Calls’, select the details for the following fields:

- Tags – The available tags will appear in a dropdown menu. The list will be imported with the prospects filtered based on your selected tags. Multiple tag selections are allowed. Only prospects that match all the selected tags will be imported.
- Battlecards – The Battlecards available under Administration » Battlecards are listed here. You can select the Battlecards you wish to use during dialing. These Battlecards will be displayed in the Settings Summary window under the Battlecards section.
- Save your List As – Name of the list that is being imported from Gong (will be displayed in the My Lists tab). Defaults to ‘Gong- Manual Calls’. If needed, you can change the name.
- Import Tasks By – Defaults to Due Date and Order Ascending. If needed you can change the required sorting order. The prospects will be sorted and imported in the order selected.
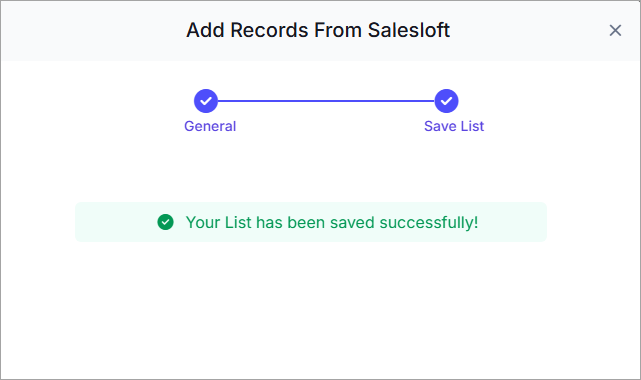
- Click Next to import the report into the Lists tab. A notification window saying ‘Your list has been saved successfully’ will be displayed. Click the Close
 icon to close the window.
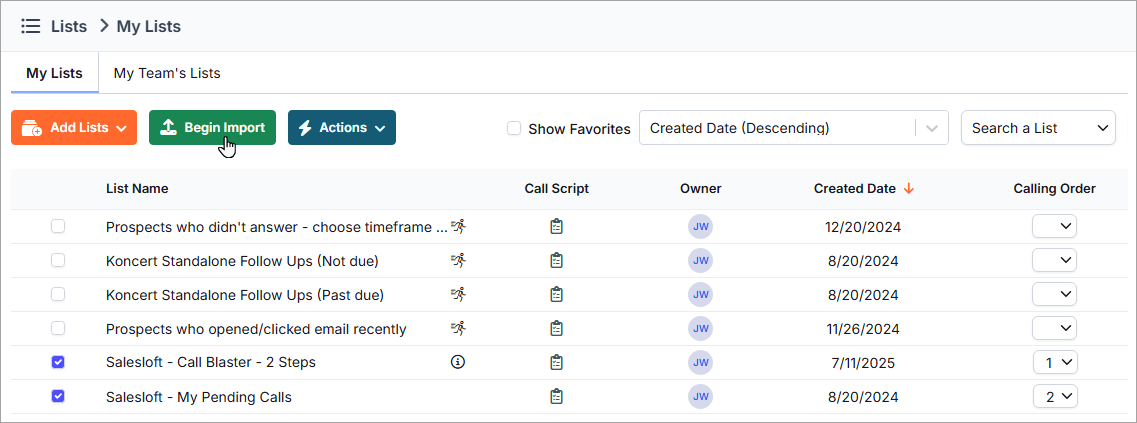
The selected report from the Gong will be uploaded and listed in the Lists tab.

An Info  icon next to the List name displays the selected steps in the Sequence/Cadence associated with the list.

Upload to Session for dialing
Once you have imported the Call List(s) from the Gong, the next step is to upload the Call List(s) into the Dialing Session tab for dialing.
Below you can find how to select and move the imported Call List(s) into Dialing Session:
- In the Lists tab, select the checkbox for the list(s) you want to upload into Dialing Session. You can select up to four list(s) at once.
- Choose the Calling Order (1 to 4) for each selected file.

- Click on the Begin Import button to upload the selected list(s) into the Session tab for dialing.
NOTE: If you have selected multiple files, then the alert message below will be displayed when clicking the Begin Import button.
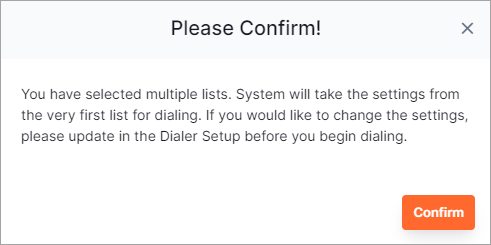
This notifies the user that the dialing settings configured in the very first list will be applied to the successive lists. If needed, you can change the dialing settings before you begin dialing.
If you have selected multiple files to upload and you did not choose the Calling Order to merge, then an alert message below will be displayed with the above alert message, when clicking the Begin Import button.

Click Confirm to begin and merge the lists or click the Close  icon to choose the required Calling Order.
- The Import Status screen will be displayed with the upload status of each file, i.e. the number of records imported/processed.
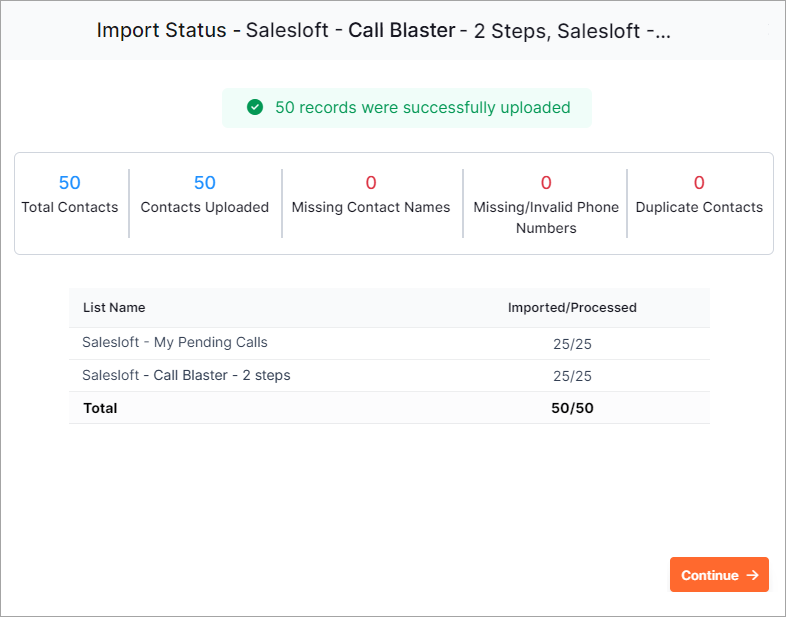
NOTE: During upload, if you have any duplicate records (or contacts) or records with missing contact names or invalid/missing phone numbers then those records will not be uploaded into the Dialing Session tab. The Import Status window will also display the following details:
- Total Contacts – Number of prospects in the list
- Contacts Uploaded – Number of prospects that uploaded successfully
- Missing Contact Name(s) – Number of prospects who failed to upload due to the missing Contact Name field
- Missing/Invalid Phone Number(s) – Number of prospects who failed to upload due to missing Phone Number across all phone columns
- Duplicate Contact(s) – Number of prospects failed to upload due to duplication
NOTE: You can see the message '<count> records were not uploaded' which visibly indicates the user about the count of records that failed to upload during the importing process.
In addition to this, the Info  icon are visible under the Missing Contact Names ,Missing/Invalid Numbers and Duplicate Contacts fields in the Import Status window. The users can instantly view the records with invalid phone numbers, without any phone number or contact names upon clicking the respective icons.
- Click on the Continue button to proceed to the Dialing Session and start dialing.
When the list is uploaded from Gong, the columns Due Date, Step Display Name, and Sequence Name will be added as the last three columns.
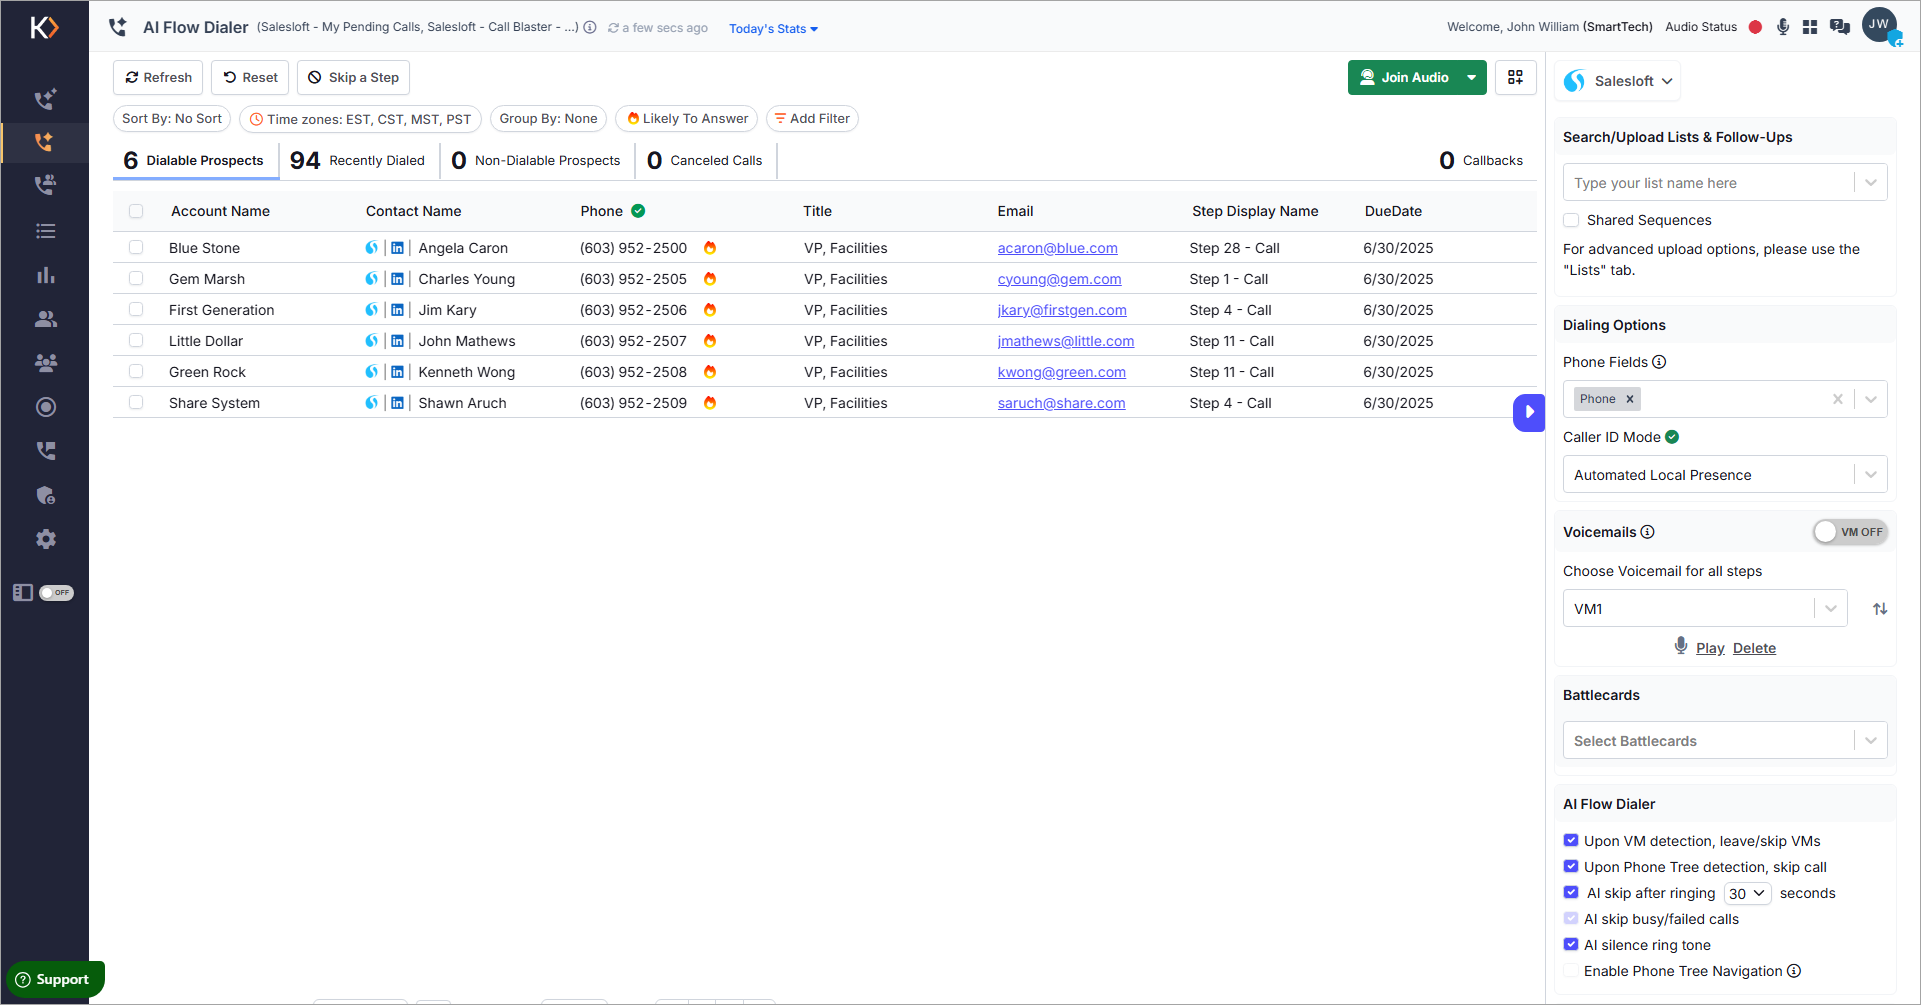
From the Dialing Session tab:
You can also directly import a list from Gong into the Dialing Session tab.

- For standalone orgs integrated with Gong, Gong is selected by default as the Source dropdown.
For CRM orgs integrated with Gong, in order to retrieve the call lists from Gong, the Source dropdown should be selected as Gong.

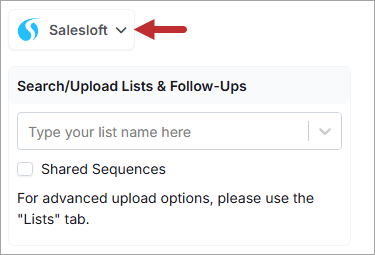
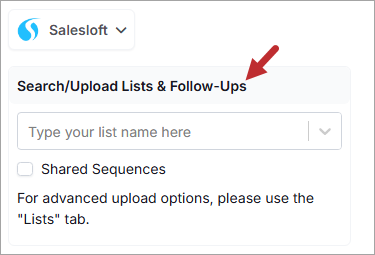
- The Search and Upload Lists section, allows users to search and import Call lists from the Gong.
By default, if no call list is visible in the Dialing Session tab, the dropdown displays the names of the 5 most recent call lists, along with Pending Calls and Manual Calls.
However, if recent call lists are visible in the Dialing Session tab, the dropdown will list 4 recently uploaded call lists.

You can directly search and import reports into the Dialing Session tab by selecting the sequence you wish. By default, only sequences you own appear in the searches.

When a sequence/cadence is selected, the Choose Steps dropdown will be made visible. By default, all available steps in the sequence/cadence will be selected.

Users can select or remove steps as needed.

After selecting the desired steps, click the Upload button to import the sequence/cadence with selected steps directly into the Dialing Session and begin dialing.
Enabling Shared Sequences expands your search to include:

- Sequences created by other users.
- Sequences shared directly with you by managers or other users.
However, when you import the shared sequence, only the prospects you own within that sequence will be imported into the Dialing Session.
- Once selected, the call list will be automatically imported into the Dialing Session tab. The call list is now ready in Koncert for dialing. You can proceed to initiate the dialing session.
NOTE:
- Koncert automatically adds the lists to the Lists tab if they are not already available.
- Additionally, users can search and import any available lists from the Lists tab and dial them as needed.
Please contact Koncert Support for any questions at support@koncert.com or 603-952-2505.
NOTE: The information provided here is for informational purposes only and should not be considered as a legal advice. Please consult your legal counsel regarding compliance with relevant laws.
Was this article helpful?
That’s Great!
Thank you for your feedback
Sorry! We couldn't be helpful
Thank you for your feedback
Feedback sent
We appreciate your effort and will try to fix the article